Having your MySQL data on a separate partition is important, why?
Having your MySQL data on a separate partition is important because when your root partition fills up and no space is left, your system won’t be able to boot and might crash when running, you then have to boot from a recovery disk to remove files before you can boot on your normal system again.
This is critical for servers that you can’t allow to be down for an hour or two!
The solution
The solution is easy, you just move your MySQL data to a separate partition, and this problem won’t occur any longer, the only thing that happens when you run out of space, is that the MySQL can’t write any new data to the database, which is better than the entire system crashing and being unable to boot.
In this guide i will show you how to make the changes needed to get this problem resolved.
How to do it
Below I will show you the commands and screenshots of what you need to do, to make this change on your MySQL server.
In this guide I will demonstrate how to do it on a Debian Linux (Wheezy 7.1) server. But it should be the same for Ubuntu servers and other Debian versions, but on other Linux distro’s you might have to use different commands)
Add the hard disk
First you add the hard disk to your system, to do this you sadly have to turn off the server.
Turn off the server, and add the seconds hard disk, if you are running it in a virtual environment like VMware, you have to add a new disk to the virtual machine running your MySQL.
Now start your server up again
Find the new hard disk
Once your server is started up again, log in as root or another user with root privileges.
Run the following command to see what hard disks you have connected and the system has found:
ls /dev | grep sd
The output should look something like this:
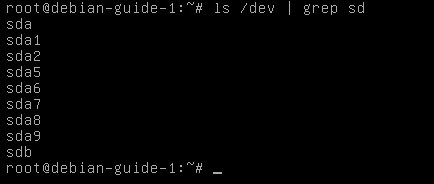
You probably have two disks called “sda” and “sdb”, there will also be some called “sda1” and maybe “sda2” these are partitions, the ones without numbers are the disk’s
As you can see in the screenshot above, i have 2 disks, called “sda” and “sdb”
sda = Your main hard disk that contains your root partitions where your Debian, MySQL and other software is installed
sdb = The hard disk you just added, note that it does not have any numbers behind it
If you have more than two hard disks in your server, there will be more in this list, incremented by the last letter, e.g. sdc, sdd, sde and so on.
In this guide, you have to replace “sdX” with the hard disk’s letters you just added that contains no partitions, in this example it would be “sdb”.
You can also use the following command to view some more information about the hard disk
fdisk -l
It should output something like this:
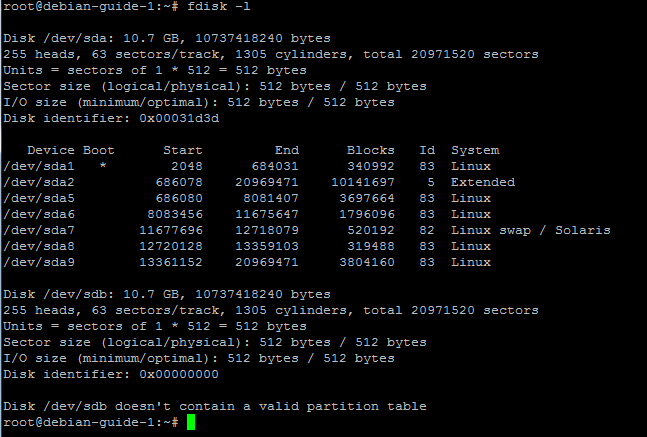
As you can see, I have a lot of partitions on sda, but sdb is empty. The hard disk I added (sdb) is 10 GigaBytes in size – if this was for a production MySQL, I would recommend a little bigger because hard disk space is so cheap today. But since this is only for the guides purpose, 10GB is more than enough.
Create the partition on the new hard disk
Right now you only have a RAW hard disk on your system, with no data, no partition table and no partitions, so you have to create those things before you can use the hard disk.
Create the partition table and partition
Run the following command
fdisk /dev/sdX
You should see the following output, and you are not returned to the shell, since you just run a program and are still running it.

You now have to type “n” and press Enter to create a new partition,
Then the output should look like this:
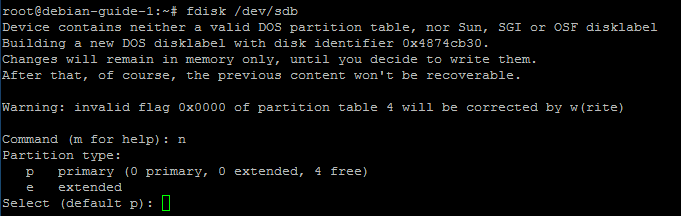
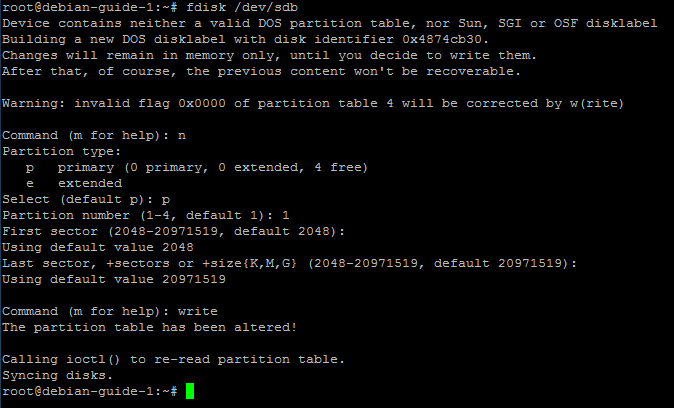
Now type “p” and press Enter to choose that the partition has to be a primary partition.
Now type “1” and press enter, to choose the number for the partition. Since it’s the first partition on the harddisk you have to type “1”
Now press Enter again to verify the default “First sector” of “2048”.
Press Enter again to verify the default “Last Sector”. By choosing the default, the partition will get the space of the entire hard disk. Since we are only creating one partition this is the way we want it.
Now type “write” and press Enter to write the changes to disk.
At the end if you look up at the terminal history it should look this this:
If you type the command
ls /dev | grep sd
again you should now see that “sdb1” has been created, like this:

Create the filesystem
You now have your hard disk, partition table and partition, only a few more commands are needed until you can use the hard disk.
You have to create the filesystem, since the partition is still empty.
There are many file systems out there, and they all have their advantages and disadvantages. “ext4” seems to work out pretty well for me and I like it, so that’s what i’m going to use in this guide.
I also recommend ext4 for MySQL data, because it’s a little bit more reliable than some other file systems.
Run the following command to create the filesystem:
mkfs.ext4 /dev/sdX1
This might take a minute or two, depending on how big your partition is, mine is only 10GB so it took less than 5 seconds.
The output should look like this:
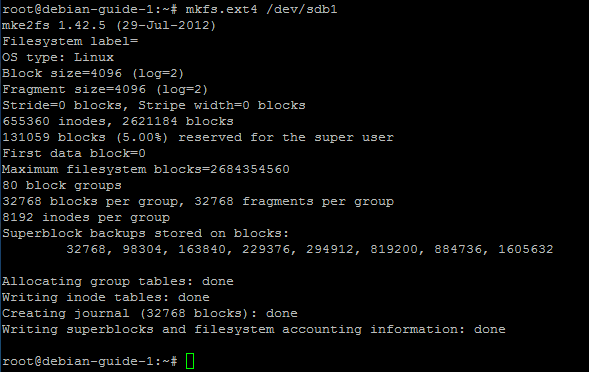
The filesystem has now been created, only one step left!
Create a mount point
To use the new partition, you have to “mount” it, this is what you do to tell the the server where and how to access the partition. You do this by first creating a new folder where the partition has to be mounted later on.
In this example, I will use “/mysql_data”.
Run the following command to create the directory
mkdir /mysql_data
Now you have a new empty directory with the name and path “/mysql_data”, so the next step is to tell the server to mount the partition on that folder.
You do this by editing this file: /etc/fstab
Edit the file by opening it in your favorite text editor, in my case this is “Nano” which is default on Debian servers, but you might have to use “Vi” on other servers. This guide will only cover how to do it using “Nano”.
Run the following command:
nano /etc/fstab
You should see the following in fullscreen:
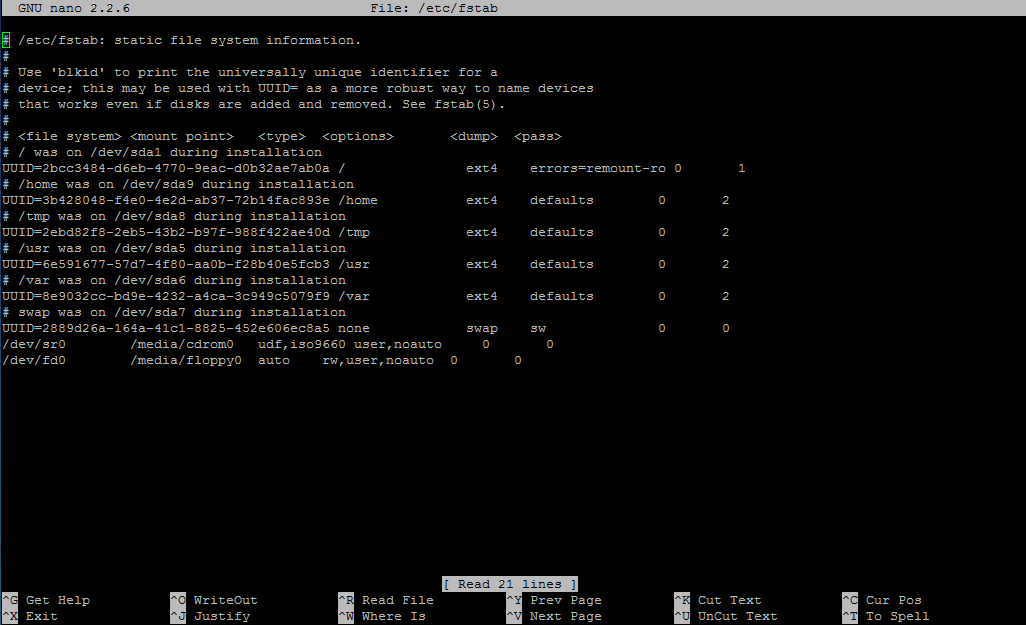
Note that because I have a lot of partitions on my first hard disk, I probably have a lot more lines than you.
Move the cursor to the bottom by using the arrow keys, until you are on a empty line.
Now type the following (the spaces between the words are tabs, or space it does not matter which one as long as you use one of them):
/dev/sdX1 /mysql_data ext4 defaults,errors=remount-ro 0 1
The “errors=remount-ro” makes sure that if any errors occur the partition will be remounted in read-only mode, this makes sure that you almost always are able to read your data.
Press CTRL+o(letter left of “p”) on your keyboard and press Enter to save the file, then press CTRL+x to exit nano
By adding the mount point to “etc/fstab” you make sure that the server remounts it upon reboot.
You are now back in your terminal, so type the following command to mount the newly created mountpoint:
mount /mysql_data
There is no output on this command, unless there are any errors.
You now have your harddisk partitioned, and mounted, and only need to move your MySQL data in the next steps!
You can view the files on your new partition by running the following command:
ls /mysql_data
There should not be anything else than “lost+found” since you have not created any data on the partition yet.
Move MySQL data
You now have to move the data, and tell the MySQL server where the new location is.
Stop MySQL server
Before you do anything below, you have to stop the MySQL server – You MySQL server will be offline and unavailable in this period and I can’t tell you how long it will take.
If you have any webpages or other public content that rely on your MySQL server, you have to plan ahead before you do the next steps.
Depending on how big your database is, this can take a long time, it will take the amount of time i takes your hard disks to copy the data.
When you are ready to stop the MySQL server, run the following command:
service mysql stop
It should output “OK” like in the picture below:
![]()
Locate the current MySQL data directory
First you have to find where your MySQL data is now, you can do this by running the following command
cat /etc/mysql/my.cnf | grep datadir
The output should only be one line showing you where your MySQL data is located, for me it’s at “/var/lib/mysql” as you can see in the screenshot below:
![]()
You have to remember this path, since you will need it in the next steps.
Copy all the MySQL data to the new disk
I always choose to copy, and not move. This way I can always go back in case something goes wrong!
I then delete the old data, when i have tested that everything is working.
To copy the data, run the following command. This is the part that might take a long time to finish depending on the size of your database:
cp -rp /var/lib/mysql/* /mysql_data
When it’s done, you should be returned to the terminal, and you are allowed to write commands again. The command above does not give any output unless there are errors.
Run the following command to verify that the data is on the new harddisk:
ls /mysql_data
It should look something like this:
![]()
Tell MySQL that the data has moved
You have to use “Nano” or “Vi” again to edit the MySQL configuration file. Run the following command:
nano /etc/mysql/my.cnf
You should now have the following image in fullscreen:
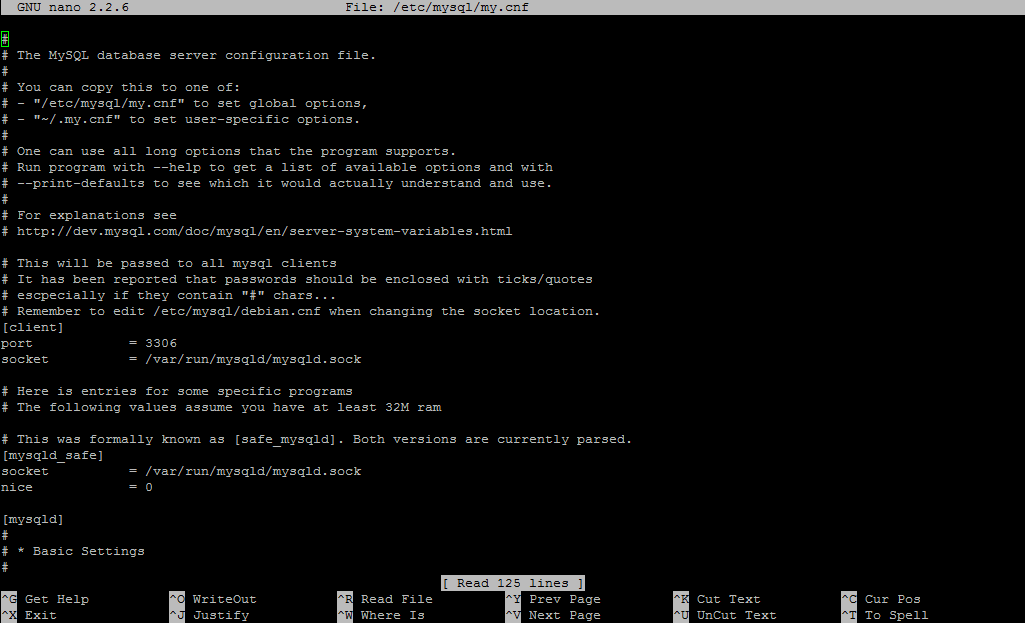
There are a lot of lines in this file, and you have to find the ones that look like this:
[mysqld]
#
# * Basic Settings
#
user = mysql
pid-file = /var/run/mysqld/mysqld.pid
socket = /var/run/mysqld/mysqld.sock
port = 3306
basedir = /usr
datadir = /var/lib/mysql
tmpdir = /tmp
lc-messages-dir = /usr/share/mysql
skip-external-locking
Here you have the line that starts with “datadir”, this is the one we need to change.
Change it from:
datadir = /var/lib/mysql
To:
datadir = /mysql_data
If you use InnoDB you might have to change other lines in this file, containing “/var/lib/mysql” to “/mysql_data”
Now press CTRL+o (the letter left of “p”) and Enter to save, and CTRL+x to exit nano.
Move the old data
Move the old data, to make sure that it is not used by mistake.
Run the following command:
mv /var/lib/mysql /var/lib/mysql.backup
Start the MySQL server
The data has been moved, mysql have been informed of the new location and everything should be ready to start up the MySQL server again.
Run the following command to start the MySQL server
service mysql start
It should output “OK” like in the screenshot below:
![]()
If there were no errors, and it did not fail, then everything went like expected, and you are now up and running on your new hard disk!
Remove old data
When you are 100% sure all your data has been copied to the new location, and everything is running OK including your websites or other services that use your MySQL database, then you can delete the old database data with the following command:
rm -r /var/lib/mysql.backup
That’s it.. You’re done 🙂
“start: Job failed to start” error
If you get the “start: Job failed to start” when trying to start the MySQL service using the command
service mysql start
Marco was so kind and post a solution for this problem in the comments, and I will include it here too.
The reason for this error is that AppArmor is running, this is default on some Ubuntu installations, SLES and other Linux distributions (not on Debian or CentOS)
How to fix it
Edit the AppArmor file using nano or your favorite text editor, the file is located at
/etc/apparmor.d/usr.sbin.mysqld
You need to modify any /var/lib/mysql reference (the old directory your MySQL data was located, if this was different in the previous steps, then it will be different than this example too) to your new /mysql_data (If you mounted the new harddrive elsewhere, you should change it to the correct new path for your MySQL data like in the previous steps)
Now try starting the MySQL service again, and it should work.
service mysql start
The description is pretty good but I found some issues with MySQL 5.5.38 on Ubuntu 14.04.1using InnoDB.
I followed all the instructions for moving the DB files to the “external drive” but, when I tried to restart mysql server with command “service mysql start” , I got an error like:
start: Job failed to start
I looked into the error file (/var/log/mysql/error.log) and I saw something like:
/usr/sbin/mysqld: Can’t find file: ‘./mysql/plugin.frm’ (errno: 13)
140829 7:25:16 [ERROR] Can’t open the mysql.plugin table. Please run mysql_upgrade to create it.
….
InnoDB: The error means mysqld does not have the access rights to
InnoDB: the directory.
… etc.
After some investigations, I found a useful indication here http://stackoverflow.com/questions/4182468/moving-mysql-innodb-database-to-separate-drive where they mention to update the apparmor file /etc/apparmor.d/usr.sbin.mysqld. In particular you need to modify any /var/lib/mysql reference to your new /mysql_data.
After that modification, I restarted mysql server and it worked properly.
I just noticed that looking into /var/log/mysql/error.log I see some ugly ERROR messages like:
[ERROR] Invalid (old?) table or database name ‘lost+found’
I presume they are related to the lost+found directory that’s created when you format the disk,. Albeit ugly, they don’t seem to hurt.
Thanks for the solution to the AppArmor problem. This however should not happen on CentOS or Debian, since they don’t run AppArmor default (also why I didn’t get that error, my MySQL server is on Debian)
Regarding the lost+found error. You could just move the MySQL data into a sub folder on the partition. In this example it could be “/mysql_data/mysql” so mysql never sees the lost+found folder and won’t include it.
Hello, thank you for this post.
Does any one of you know how a sda volume (operating system, MySQL, etc…) and a sdb volume (data) would behave if sda is 7500 rpm and sdb 10000 rpm ? In terms of performance, what would be the speed of such a configuration? Thanks.
10000 rpm drives are faster at accessing random files (IO) because there is less seek time (the time it takes for the reading head to reach the point on the disk where it has to read the data)
So a 10000rpm drive will always be faster than a 7200rpm. but only by a couple of milliseconds.
You will get better performance out of your mysql instance if your database is located on sdb that is a 10000 rpm disk.
Hi,
If I wanted to keep the mount point as /var/lib/mysql instead of creating a new mount point of /mysql_data, how would I do that? My thoughts for doing this are:
rename /var/lib/mysql to something like /var/lib/mysql_copy
add new disk, and create /var/lib/mysql as the mount point
copy everything in /var/lib/mysql_copy to var/lib/mysql
remove /var/lib/mysql_copy
Does that sound like it would work?
The only reason I don’t want to rename my mount point is because I have some custom scripts that pre-date me that utilize that mount point, and I’d rather not mess with them 🙂
Thanks!
Yes, you can do that too. Where you mount the new disk is up to you 🙂
It’s not often I make my way through a guide and don’t encounter any issues. This was very thorough, thanks for your excellent walkthrough.
thanks for the post! one nitpicky detail:
nano /etc/mysql/my.cfg
should probably be
nano /etc/mysql/my.cnf
Thanks, changed it